Monday, February 15, 2010

Fliud Glass Installation

Final images of my window installation panel. I was pleased with the end result, and achieved many interesting lighting effects. I can imagine over an entire window system of a building it would look produce a cool effect.
This is a detail shot of one of the panels of glass, helps to express the fluid quality.

Another overall look at the entire panel.

Sunday, February 14, 2010

Biomorphology

Check out the backbone of this African shrew. Interlocking bones give it a stronger backbone design than any other mammal on the planet. Guess digging holes in Africa can be a dangerous situation; perfect for a bridge.....
It should be fun to translate into museum board.

Broken Glass?


final product
expressions of containment

Spackle Panels

Spectrum diagram

Taxonomy diagram


The final product


a frame less panel system was a success! Forming it was a tricky process due to all the wait time and the fragile nature of Spackle, overall I'm happy with results.

Monday, February 8, 2010

Initial studies in whisker technology

One- Random placement of coated twine holds form

Two- Regularize one axis

Three- Regularize two axis, random twine as binder

Four- Eliminate forced irregularity


Spackle itself creates irregularity


Spackle clings on the whiskers, hardens and holds

The result is an irregular seeming panel created from a regularized system, one reason for its organic impression.


diagrams_torched aluminum


Diagrams_Monolithic Decay

SPECTRUM_(The range of possible directions taken)

TAXONOMY_(the lineage examined)

Saturday, February 6, 2010

The start of Spackling panels

Update...I have switched back to my original idea of Spackle and bubble wrap, it was a bit easier to control and better enforces my word "Diaphanous"


heres a start of my spackle magic. the rest of this will be posted when its completed.

special thanks to michelle,
Song by carly comando : everyday.

Friday, February 5, 2010

Glass in Suspence

I figured glass likes to refract light and it likes to break.
The first image reveals a delicacy discovered from containment of these shattered glass panes but that did not come without iteration....I was first attracted to the second image and the way the little pane fragmented.


Although venturing a little to find ways of containing the broken glass, I soon returned
to shattering; the result
was still not safe for a larger scale production (no, duct tape wouldn't cut it..._).
All needed was a wrapper around each pane, hot glue was just the trick.


Elastic and easy to apply, I soon learned how to place a refined bead and began experimentating with materials from other projects. Resin became the best containment devise...it worked great and the rest is in production.....

Plastic Resin with Beads


Taking a sheet of standard florescent light diffuser, I added colored beads that were able to fall into the different crevices in the plastic sheet. Then I added clear plastic resin, which gave an interesting effect, making the sheet very clear and accentuating the transparency of the beads.


By adding a second layer of plastic with resin and beads, it adds a multi-dimensional layer of color and geometric shapes, giving it an almost kaleidoscope effect.


Thursday, February 4, 2010

Monolithic Decay


v1.0_After the happy accident of finding trace paper buried inside my tape formwork, finding an interesting texture, I proceeded to intentionally bury trace paper within the rockite. After curing the only way for me to remove the trace was through ignition. Upon burning the trace out from the pour I was shocked to find a sort of decaying agitated monolithic form.
v1.3_The third iteration of this process trying to coax out the effect found earlier.
v1.5_Here the effect is beginning to break from the monolithic, yet still too closely tied to the forms rigid geometry.
v1.7_Finally, the effect begins to sufficiently break the confines of the monolithic, better balancing decay and monolith

?_While the process of creating these artifacts is exciting I am left questioning how to most successfully propagate this effect to a panel while minimizing weight. Any thoughts peers?


Rockite Soap Tiles

Soap and Water Mix (Dry)


Soap Only


Soap and Water Mix (Wet)


Do you think the tooling effect on the surface combined with the marbling effect is overkill on the surface effects or should there be no evidence of the process of making the tile?

Plastic Bumpz

My material is plastic [0.030 PETG] and it is being manipulated/deformed by driving a shaped dowel into the plastic at specific intervals.

As of now, the effect I am attempting to achieve is "unsteady". I also was thinking about "protuberance" (probably not a word), "deformed", and "agitated". If any of these make more sense that "unsteady" or if you have any other ideas that would be extremely helpful.

The "unsteady" effect is manifesting itself through the slight bends of the plastic as it is pounded out as well as the bow that will form in the plastic when is is hung in the curtain wall.

If anyone has any other ways to speed up the process of hitting each of these dimples one by one, that is probably my biggest concern right now.

(sorry for the bad images/backgrounds, I will put better ones up soon)

Profile of the artifact showing the "spring" quality which will hold everything in the curtain wall.


Variation in distance between the ends and the center.


Bending of the plastic through dimple placement.
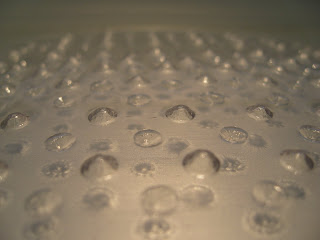


Close-up of the dimple pattern in the sheet.

Artifact experimenting with dimple patterns and spread.


Current process of gridding plastic sheet and hammering dimples.


Gridded artifact with dimples placed.

Any other comments or suggestions would be much appreciated. (especially any that can spare the ears of everyone who will have to hear my hit 10,000 dimples into a sheet....sorry in advance)